![]() If you’re managing a customized WordPress based website, say for your company, how about adding an additional Widget on the Contact Us page showing the address while the post body shows a contact form? At some part of time each WordPress user would’ve wished to add some differentiated Widgets on a special set of WordPress pages or to an entire category (say all posts in a category ‘Mobiles’ show the related posts from ‘Mobiles’ category as a topmost widget). Here’s how to achieve just that.
If you’re managing a customized WordPress based website, say for your company, how about adding an additional Widget on the Contact Us page showing the address while the post body shows a contact form? At some part of time each WordPress user would’ve wished to add some differentiated Widgets on a special set of WordPress pages or to an entire category (say all posts in a category ‘Mobiles’ show the related posts from ‘Mobiles’ category as a topmost widget). Here’s how to achieve just that.
Although there are many ways to achieve that, we’re going to deal with simplicity i.e. by using plugins. We’ll be using the Sidebar Manager component which is also part of the combined WooDojo plugin. WooThemes as we is one of the top names when it comes to designing WordPress themes, but they’ve also made some decent (yet free) plugins like WooSidebars and WooCommerce.
WooSidebars adds functionality to display different widgets in a sidebar, according to a context (for example, a specific page or a category).
Displaying Different Widgets on Different Pages/Categories
- Download and install the WooSidebars plugin from the WordPress Plugin Repository. You can also use the WordPress’s built in installer (wp-admin> Plugins> Add new) and search for WooSidebars. Activate the plugin once it is installed.
- Upon installation, an additional sub-menu called Widget Areas will appear up under Appearance in your wp-admin. Click to open the Widget Areas page. Here you can add a new Widget Area which will then appear up under Appearance> Widgets with different conditional tags about where it appears and which sidebar it replaces (if your theme has multiple).
- Click on Add New towards the top and give a name to the Widget Area. You can also add the description in the column below which will show on the widgets page.
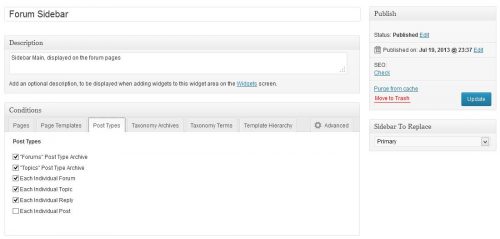
- Finally choose the Conditions about which pages, categories or tags the new sidebar will appear on. You have the option of choosing from the following conditions – Pages, Posts Types, Page Templates (if your theme supports), Taxanomy Archives or the Template Hierarchy.
- Once you’ve defined the visibility conditions, choose the sidebar that the plugin replaces. This option can be found in in the right below the publishing widget.
- Press Publish when you are done configuring your widget area.
- Open Appearance> Widgets. You’ll find your newly created Widget Area listed with the Title and Description that you chose.

- Just simply drag and drop the widgets you want to show on this sidebar, configure them to your needs. That’s it.

WooSidebars is not restricted for only the themes developed by WooThemes, instead it will work on any theme which supports Dynamic Widgets.
Facing issues or having some general queries? Leave them below and we’ll try to help you out.