
Windows 10 comes with handy options to create PDF files out of a variety of files. Windows 10 users can use the “print to PDF” option to convert a variety of files (including images, documents, webpages; etc) to PDF documents for free. But since this post is about merging image files to a single PDF file, we will stick to that.
Merging your image files to PDF is very helpful. For one, you can read/view them with ease without skipping through different files. Secondly, they are easier to share. Many social platforms such as Facebook and WhatsApp compress the shared images causing a reduction in the quality. So, the images get distorted and hard to view. However, this is not the case with PDF documents. That is why converting images (jpg/png files) into PDF documents is a good plan.
Using Windows 10’s “Print to PDF” option to merge Images into a PDF
Windows 10 includes the Microsoft PDF printer. So, you do not need to download any third-party software to complete the job.
1List and organize the images: The first thing to do is to bring all the images to one folder. You then need to organize them as older to newer.The ordering is necessary because they will be printed (merged) to the PDF file in the same order. So, unless you are okay with having them in any order, you should organize them properly.
2Select the images and choose Print: Once you are done with the ordering, select all the images which you need to combine into a PDF file.You can press Ctrl + A to select all the files in the folder. You can also hold down the Ctrl key and individually select multiple images using the mouse click. However, be sure to select them in the proper order – i.e. older to newer. That means the image you need at the first page in the PDF should be selected at last.

Finally Right click on the selection and choose Print.
3Print them using “Microsoft Print to PDF”: In the last step, you need to print the images while using “Microsoft Print to PDF” as the printer. So, select Print to PDF” in the printer drop down and click on Print. Now choose the location where the PDF file should be saved and provide a name for the file.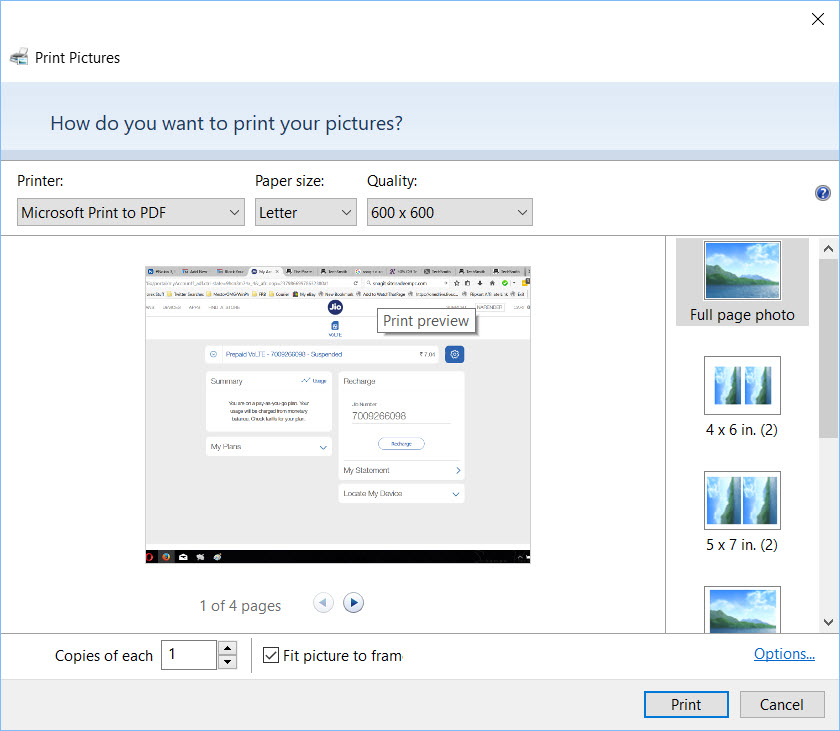
Do remember to verify the ordering of the images. The images will be joined in the same order as they appear in the “Print Pictures” dialog. So, make sure that you order the images as per your need.
You can also change some options to suit your needs. That is you can change the paper size and the size of the images. Some layouts also let you include multiple images on one page. So, use the options as per your liking and needs.
If you are using an older version of Windows, then you can resort to some of the online services which let you merge images into a PDF. However, most of them come with limits.


Add Comment