Several users have asked me for help regarding rooting their Nokia phones. The most common requests come from the owners of Nokia 6.1 Plus (Nokia X6), Nokia 7 Plus, Nokia 6.1, Nokia 7.1, and Nokia 7. Unsurprisingly, Nokia develops all these phones on the same software base – GSI_SDM660. Since the base is the same, it is very similar to install Magisk and root each of these phones.
This guide is one of the easiest and most relevant to root these Nokia phones. So, you do not need to browse the XDA forums where a lot of conflicting and outdated information is present.
Before you begin: Install all pending software updates on the phone so that you are on the latest version. Updates are harder to install when rooted, so, it is better if you start from the latest version in the first place.
Root Method 1: Magisk patched boot images (recommended)
Magisk patched images make it very easy to root a Nokia smartphone. When you boot them, you get a temporary root, which is enough to push Magisk to your stock boot image and gain permanent root. The only requirement for these boot images to work properly is that the security patch installed on your phone should match the security patch indicated in the boot image.
- Make sure that your Nokia has an unlocked bootloader. (Read: How to unlock bootloader?)
- Check the installed Android security patch on your Nokia phone. Open Settings > About phone > Android version > Android security patch level.
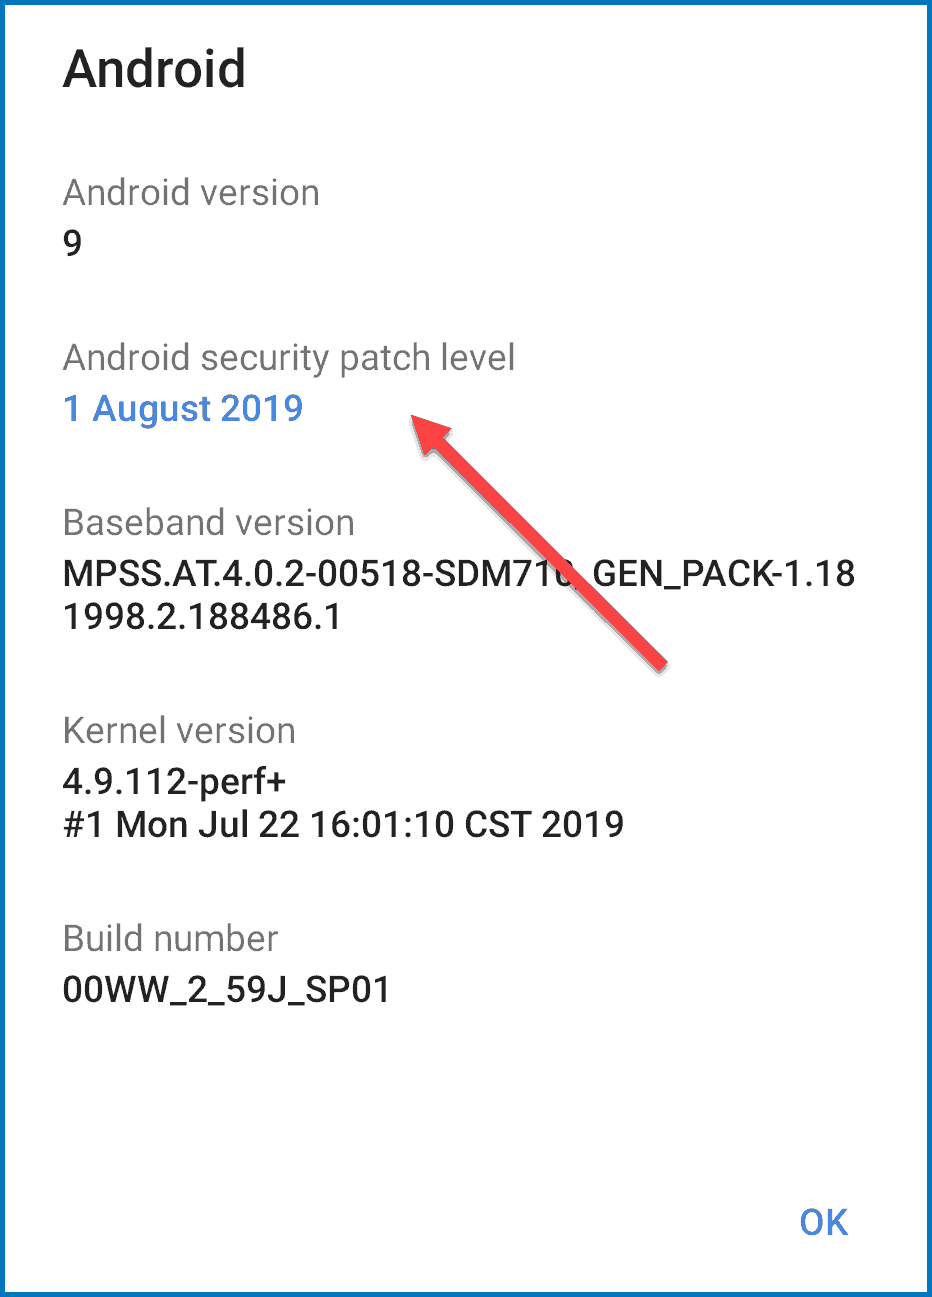
Check Android security patch level - On your phone: Download and install Magisk APK file. Download Magisk from Github.
- On your PC: Download the Magisk patched boot image for the same Android security patch. For example, if you are on May 2019 update, then use patched image for May 2019. Download patched boot image.
- Reboot your Nokia to download mode. (Read: How to enter Recovery and Fastboot mode?)
- Boot the downloaded Magisk patched image using the following command. Warning: Do not flash it.
fastboot boot magisk-patched-boot.img
Note For devices on Android 10, you might not be able to boot the file directly and the phone will get stuck on Android One screen. In that case, go back to download mode, then first flash the file to your recovery partition (which does not exist) and then boot it. So, first, run:
fastboot flash recovery magisk-patched-boot.img
It will show an error in CMD. After that try to boot the file using the below command:
fastboot boot magisk-patched-boot.img
- Wait for the phone to start up. Then open Magisk app. Select No if Magisk asks for additional setup.
- You will see “Magisk is installed” and an Install button next to it.
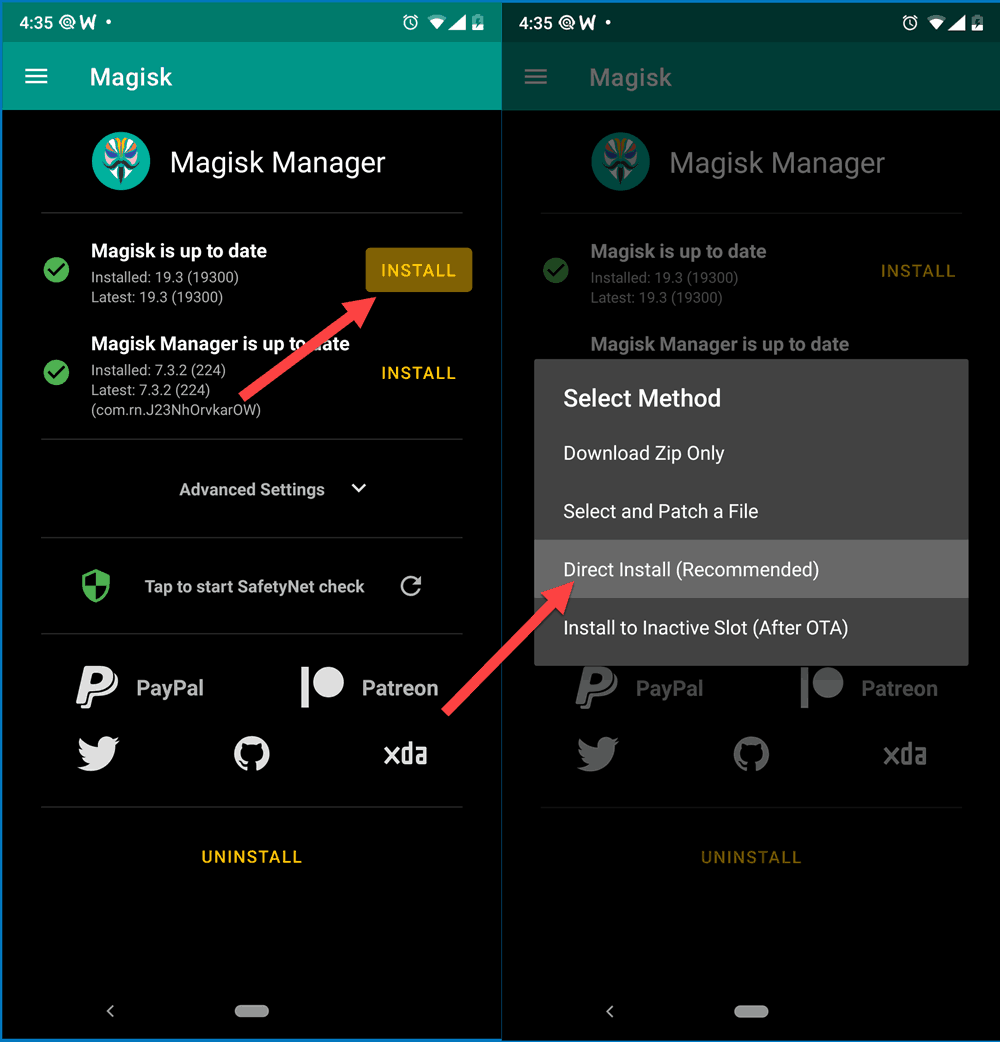
Magisk Direct Install - Press on Install > Install > Direct Install (recommended).
- Wait for the installation to finish. Then press on the reboot button to finish it.
The phone will restart, and you will have permanent root. Now you can start using your root apps. Most likely you’ll start off with restroing your apps backed up using Titanium Backup.
Root Method 2: Using TWRP
If you are unable to use the pre-patched images, then you can fall back to the classic method of using TWRP custom recovery.
- Backup all critical data from the phone as we will wipe the internal storage.
- Ensure that your bootloader is unlocked.
- On your PC: Download TWRP recovery for your device from the following links.
- Nokia 6.1 – Download TWRP (by Ayush)
- Nokia 6.1 Plus – Download TWRP
- Nokia 7, 7 Plus and Nokia 7.1 – Try any TWRP from above
- On your PC: Download the latest version of Magisk zip. You can download Magisk from Github.
- Reboot your Nokia into Download Mode.
- Since most TWRP images will have issue in decrypting the userdata, we will wipe it:
fastboot erase userdata
- Now boot the TWRP recovery. Warning: Do not flash it.
fastboot boot <twrp.img>
- When the TWRP loads, copy the Magisk zip file from your PC to the internal storage of the phone.
- On your phone: Tap on Install and select the Magisk zip file. Then swipe to confirm the flashing.
- Reboot when done.
If all went right, you will have a rooted Android system and you can start using your root apps.
Feel free to comment down below