Windows 10 is Microsoft’s best and latest operating system in the family of Windows. Since Microsoft provides Windows 10 as a free upgrade for existing Windows 7 or 8.1 users, Windows 10 now also runs on age-old PCs which barely managed to cope up with Windows resource requirements. Thus some Windows 10 PCs get super slow that it gets hard to do productive work with them. If your PC also performs slow, the following tweaks should cut down some of your frustration.
Contents
1. Clearing Temporary Files
Windows generates a lot of temporary files over the course to make information access easier and faster. Most of these temporary files are cleared automatically when the associated application is stopped, but some temporary files stay due to improper shutdowns or poor implementation within applications. Clearing these left over files can boost the performance of a Windows system.
- Right click (or tap and hold) on the start button and choose Run.
- Type %TEMP% in the run window and press Enter (or tap OK).
- It will open a new explorer window with a lot of folders and files.
- Select and delete all of these files and folders unless you are required to retain some temporary directories.
Depending on the size of the temporary files and the speed of disk, deletion can take a few minutes.
2. Disabling Unwanted Windows Services
Windows Services are programs which run in the background to provide assistance to the foreground programs or to perform certain automated tasks. When more and more programs are installed, bundled services also go into the services list. While some services are required to be running in the background at all times, others are not (especially the 3rd party ones). So disabling unwanted Windows services can bring a performance boost to the system. However please don’t disable essential Windows programs and services, otherwise it will result in OS related issues.
- Right click (or tap and hold) on the start button and choose Run.
- Type msconfig and hit Enter key to open the System Configuration window.
- Choose the services tab.
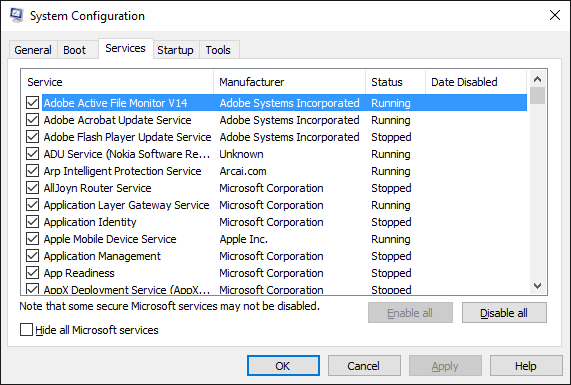
- Browse through the services to find some unwanted/unneeded ones. You might want to use the checkbox to Hide all Microsoft services.
- Uncheck the boxes in front of the services which you want to disable and press OK.
A prompt will appear which will ask you to restart, you might want to restart it just then or at a later time. There’s no issue if you plan to restart later.
3. Reducing Visual Effects to Improve Performance
Windows makes use of Visual Effects and transitions to make Windows look visually appealing. Certain effects require more amount of graphics processing and thus can slow down systems which are running on older hardware. So, if you’re facing sluggishness in Windows, trimming down on Visual Effects can improve the things to a large extent.
- Right click on the This PC icon on the desktop or the start menu and choose Properties.
- Choose Advanced system settings from the sidebar at the left.
- Under the Performance category, Click/Tap on Settings button.
- In the sub menu that appears, change the selection to: Adjust for best performance.
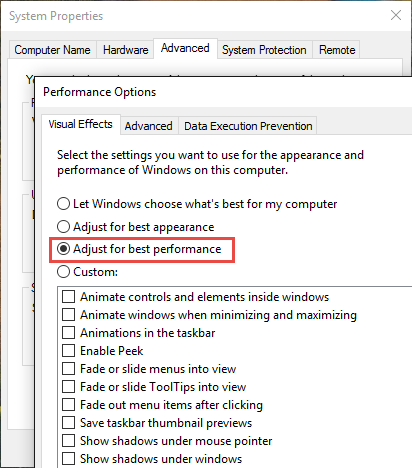
- Click OK.
4. Disabling Start-up programs
Startup programs are the ones which load up automatically during Windows logon. These programs may either run as a foreground application or as a background process. Some of these startup programs are rarely used, but because they are running, they eat up system resources and add to the CPU load. So, it is a good idea to disable the startup of unwanted programs. If needed, they can be manually started anyways.
- Open Task Manager (Right click on a blank area of Taskbar and then click on Task Manager.
- Switch to the Startup tab. It will now list some apps and programs. Startup impact is the amount of resources a program uses and thus delays the startup of Windows.
- Identify the programs that are not needed to be running at the Windows startup. Anything other than parts of the anti-virus application can be disabled.
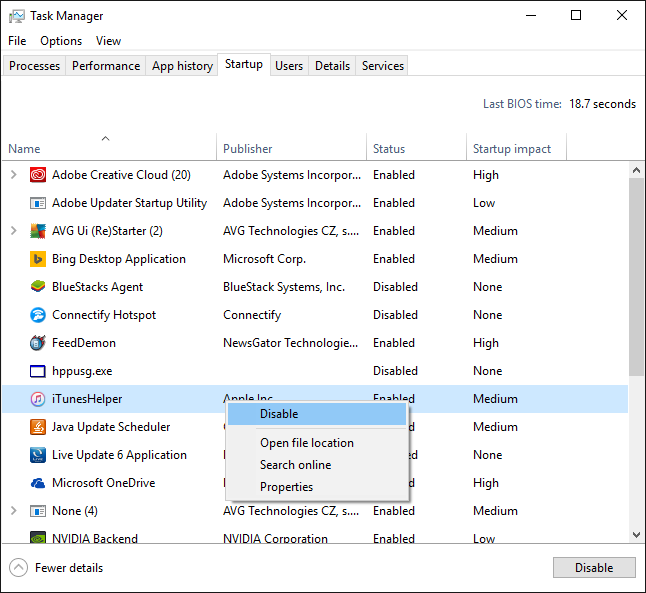
- Right click on the unwanted programs and choose Disable.
5. Closing Programs Minimized to the System Tray
Certain programs (such as Skype, uTorrent; etc) don’t get closed when you click the close button. They instead minimize to the system tray (or notifications area) where they aren’t visible but continue to eat up system resources.
- Click/tap the up arrow (chevron) at the right of Taskbar.
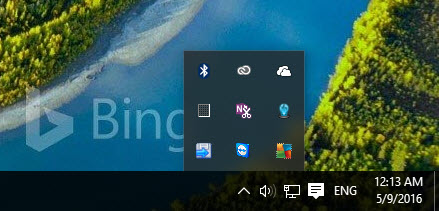
- Right click on any unneeded program and choose exit/close (each program has its own option for exiting).
- If you can’t find close option for a program, kill it using the task manager.
6. Uninstalling Unused Applications
Windows users often download programs from the internet, but they rarely uninstall them after they have served their purpose. The result is a lot of programs installed on the system, eating up space and clogging up the Windows registry. It is always a good idea to uninstall programs which are no longer needed.
- Open Settings app.
- Choose System and then Apps and features from the sidebar at the left.
- Browse through the list of installed applications and uninstall the ones which you no longer use.
After having done all that is mentioned in the post, you’d get a PC which is faster and more usable than it was before you started off. Share the article with your friends and who knows you might get some nice appreciation for helping them speed up their PCs as well!