Asus Zenfone 2 is a pretty interesting device, firstly because it targets much wider price points than probably any other smartphone in the market and secondly it packs much varied (but still great) specifications which make each variant a good buy at the price that it targets. Anyways, if you own one of the Zenfone 2 variants (ZE550ML or ZE551ML) and want to gain root access, this post provides detailed instructions for that. So, let’s get started.
Rooting the Asus Zenfone 2 (ZE550ML & ZE551ML)
There are two methods to root the Asus Zenfone 2. Please follow the instructions step by step so to eliminate any chances of phone getting bricked. And even though the rooting process will not affect your user data, you should still backup any important data if something wrong happens. Also, if you want to take OTA updates seamlessly, DO NOT alter (add/remove) any system apps.
Method #1 – Using Temporary CWM
You should follow this method to root the Zenfone 2 device because firstly it is easy, secondly it requires minimal downloading. You can also install OTA updates on your device if you follow this method to root your Zenfone 2 device (after un-rooting). CWM is only temporarily loaded and your stock recovery is not replaced.
- Download and Install the USB Drivers.
- Download THIS zip file containing temporary CWM package and extract the contents to an accessible location.
- Turn on USB Debugging and then connect your phone to the PC.
USB Debugging can be accessed by going to Settings> About> Software Information> Tap Build number 7 times. Then go 2 steps back and choose Developer options> USB Debugging. - Copy SuperSUxxx.zip (xxx is the SuperSU version) to the root of your SD card.
- Run cai_dat_CWM.bat. In the command window, type ACCEPT (in capitals) and hit Enter.
- Type T4 and hit enter again. Your phone should restart infastboot mode, take the commands and then load the temporary CWM. It will take about a minute for this to complete.
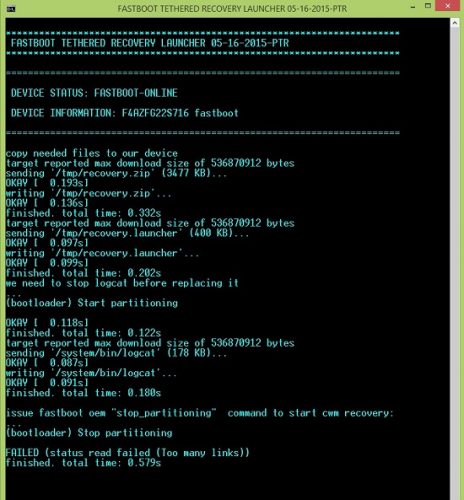
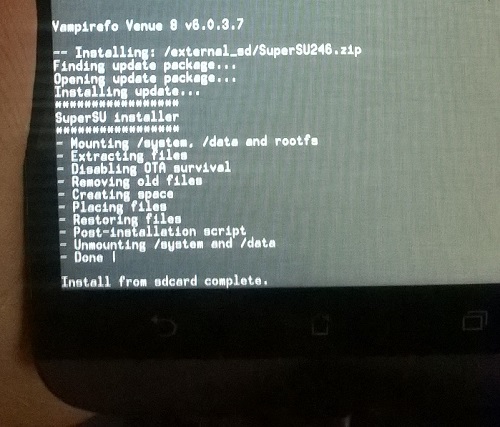
Fastboot Commands being Paased - When the phone boots CWM Recovery, you can disconnect the device from the PC. Then select Install Zip by using Volume Keys to highlight and Power Key to select.
- Select choose zip from external sdcard and then select the SuperSUxxx.zip file copied to the SD card in step 4. Select Yes – Install SuperSuxxx.zip to start flashing. It will take a few moments for theSuperSU to be installed, so be patient.
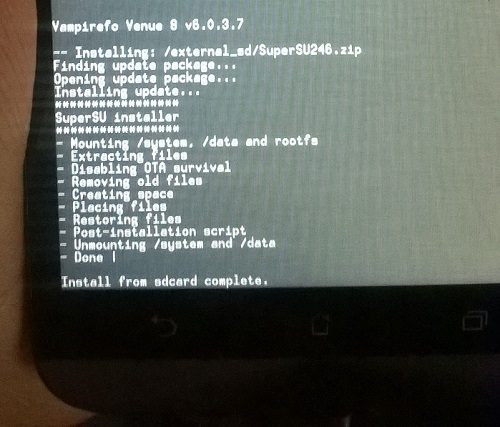
Installing SuperSU - When done, reboot your phone and that’s it. Verify the root by installing any root checker app from the Play Store.
Method #2 – Flashing the Pre-Rooted ROM
If for some reason the previous method fails or you just want an alternative way, you can download and flash the pre-rooted firmware. Disadvantages here are that first of all you need to download the full fimware (about 1GB in size) and secondly, OTA updates cannot be installed if you update the SuperSU binaries.
- Download and Install the USB Drivers.
- Download and Install ADB (if not already installed).
- Download the pre-rooted firmware files (about 1GB). Please choose the files for your device as mentioned below. If the latest firmware is not available, wait a few days as the files are regularly updated. Also choose the correct localized version (WW/CN/JP etc). Flashing an incorrect version might brick your phone.
ZE551ML – Z00A
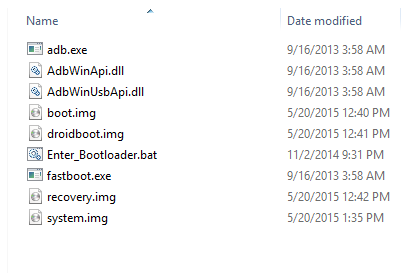
ZE550ML – Z008 - Download and extract the Flash Tools zip file to an accessible location.
- With WinRAR/WinZIP installed, open the firmware folder double-click the Z00x_WW_x.x.x.x_system_w_root.zip file and extract it. The smaller files will be combined and the complete system.img will be available.
- Move system.img, boot.img, droidboot.img and recovery.img to the folder where you extracted Flash Tools.zip in step 4.
Flash Tools Folder - Turn off your Zenfone 2, press and hold the Volume Up & Power Key together till it vibrates.
- When the phone gets into fastboot mode, connect it to the PC.
- Open the Flash Tools folder. Right click while holding down the shift key and choose Open command window here.
- Pass the following commands in the command window one by one after the previous is finished. The last command will take a few minutes to complete so do wait till finished shows up before disconnecting the phone.
fastboot flash fastboot droidboot.img
fastboot flash recovery recovery.img
fastboot flash boot boot.img
fastboot flash system system.img
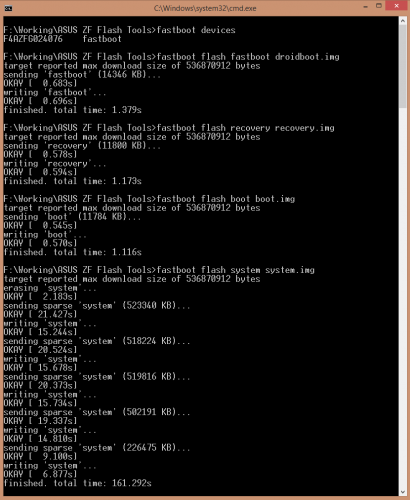
Flashing Zenfone 2 - Reboot when done and you’ll have a rooted Zenfone 2.

If you’re new to rooting, you might get confused with the procedure. If you come across any such confusion, do not make any guesses with a certain step unless you know what you’re doing. If you don’t understand something, please leave a comment below and we’ll try assisting you with that.