One of the cool feature which was introduced in Windows 8 that is screenshot. By pressing the Windows Key + PrtScrn button simultaneously screen shot is captured and saved in C:UsersUsernamePictures. It is automatically names as Screenshot(#).png {# denotes the number of screenshot index}. But even after deleting the all the images in the screenshot folder the index doesn’t gets reset, that is the next screenshot will have a higher index. It will not start from 1. So here’s how to reset screenshot index number in Windows 10.
Step To Reset Screenshot Index Number in Windows 10
- Open Registry. To open it press “Windows key + R” to open “Run” window and then type “regedit” and hit “Enter”.
- Now navigate to the following registry.
HKEY_CURRENT_USER\Software\MicrosoftWindowsCurrentVersion\Explorer
- In the right pane search for DWORD value named ScreenshotIndex, which stores the next screenshot’s index.

- Double click on it, and change the entry in the Value Data : Field to 1.
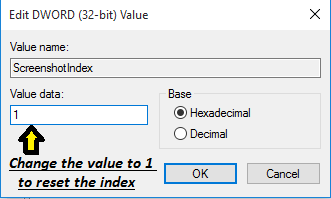
Reset Screenshot Index Number
Check this video tutorial for better understanding.
That’s it. Now you have reset the Screenshot index.