What ever might be the reason, you have decided to transfer (Migrate) your domain from GoDaddy to BigRock. So, lets get on to the process of migration. Follow the step-by-step guide carefully to transfer your domain with ease.
If your domain name is less than 60 days old, it is not possible to transfer that domain & If your domain name is previously transferred within 60 days, then it is not possible to transfer it again within 60 days.

Contents
Step-by-step Guide for Domain Transfer
Part 1 – Getting the things ready
Before initiating transfer request in BigRock, you need to do some per-requisite tasks at GoDaddy
- Unlock your Domain
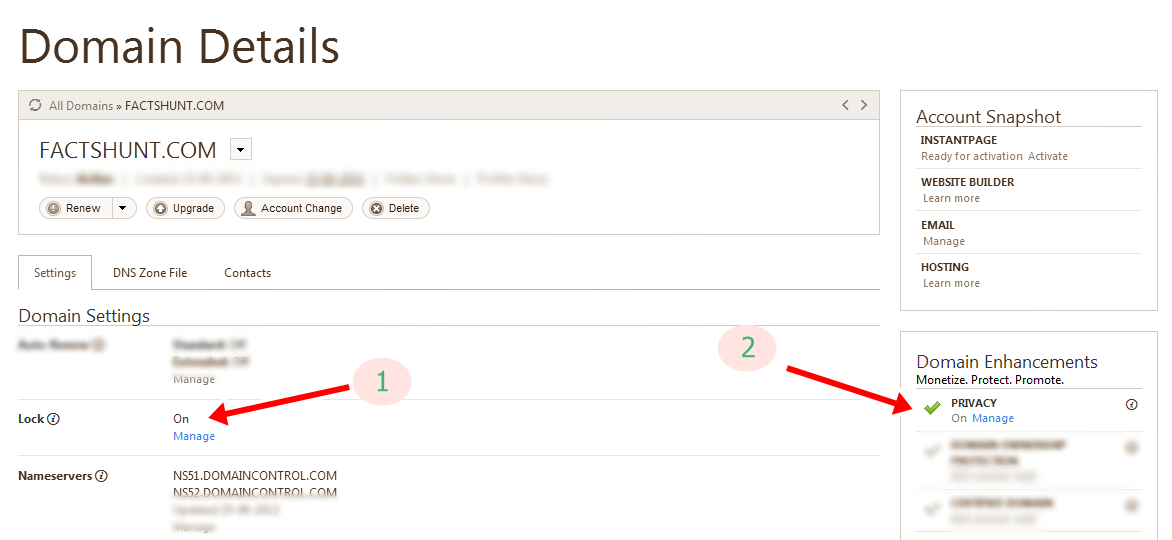
- GoDaddy’s Administration panel >> Select the domain you wish to transfer >> Domain details

- Now click on the ‘manage link’ next to Lock feature and turn it off.
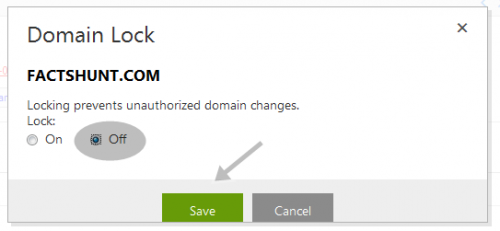
- GoDaddy’s Administration panel >> Select the domain you wish to transfer >> Domain details
- Cancel Private Registration (If you have opted)
- Click on Private registration in your admin panel and then click ‘manage‘ which will take you to your admin panel at Domains at Proxy.
- Cancel your private registration for your Domain which you want to transfer.

- Obtain Authorization code (Domain Secret).
Go to Domain Details again and scroll down. You shall see Authorization code and Email my code as shown in the pic. Click, and your Domain Secret or Authorization code will be Emailed to your contact E-mail.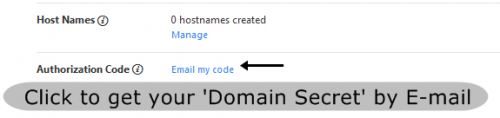
Part 2- Initiate Transfer at BigRock
To make the transfer process faster, I suggest you to create your ‘BigRock Account’ before initiating the Transfer process. By this you can save time while checking out. During the migration process, you’ll be receiving necessary E-mails and for many your confirmation is required. Do monitor your contact E-mail and confirm certain aspects constantly.
- Initiate Transfer at BigRock
Go to the official transfer page of Bigrock.com (Click here) and type in your Domain name which you wish to transfer and submit it. You’ll be taken to checkout area or Login page if you have not yet logged in. Choose the features and number of years to extend or renew as per your requirements and check the grand total.
- Enter coupon code for discounts
Bigrock always has a coupon for discounting. You can obtain it from Bigrock home page but it is restricted to only 15%. If you couldn’t find a coupon code to use, you can use factshunt.com as the code to get 10% off on the final amount.
- Checkout (via PayPal, Debit/Credit cards or otherwise)
After making sure all the particulars of your cart and the Grand Total after discount, you may proceed to payment area where you can successfully complete the transaction. Payments can be made via PayPal, Debit/Credit cards or by other means which they accept.
Part 3 – Authorizing & Finalizing the Transfer
- Submit ‘Domain Secret/Authorization code’ to Bigrock
Login to your Bigrock Admin Panel and click your Domain. Domain registration page opens up and you can enter your Domain Secret/Transfer Code. Click Submit as shown in the pic.
- Accept Transfer at GoDaddy
- Come back to your GoDaddy products page and under Domains click Launch. You’ll be directed to Pending Transfers page.

- After it redirects to the page mentioned above, select Accept Transfer and click OK.
- Come back to your GoDaddy products page and under Domains click Launch. You’ll be directed to Pending Transfers page.
The Transfer process usually completes within 5-6 days, during that time, you may experience downtime. New DNS settings take 72 hours or so to completely propagate through the servers, so be Patient & be Cool. If you have any troubles or doubts kindly leave below in the comments section. 🙂