![]() Start menu is back with Windows 10 and it is the default setting for users having a Mice and Keyboard attached to their systems. However, the Start Screen (or full screen Start Menu) is not gone. It still exists and should be the default layout for those of us using Touch Enabled devices such as Tablets. For those interested in using the full screen Start on their desktops, it can be easily enabled in Windows 10. Similarly, users who want to change from full screen Start Screen to the smaller Start Menu can also follow this tutorial.
Start menu is back with Windows 10 and it is the default setting for users having a Mice and Keyboard attached to their systems. However, the Start Screen (or full screen Start Menu) is not gone. It still exists and should be the default layout for those of us using Touch Enabled devices such as Tablets. For those interested in using the full screen Start on their desktops, it can be easily enabled in Windows 10. Similarly, users who want to change from full screen Start Screen to the smaller Start Menu can also follow this tutorial.
Switch Between Full Screen and Compressed Start Menu
Desktops users (especially those upgrading from Windows 7) will be more happy with the smaller Start Menu as it works better while using Mouse as the controller. But for those with Touch capable screens, full screen Start Screen will be a better idea as it is a way more touch friendly than the Start menu. Anyways, here’s how to alternate between the two and choose the one you like.
- Click Start and choose Settings.
- Open Personalization and choose Start from the left menu.
- Enable or Disable the toggle under Use Start full screen.
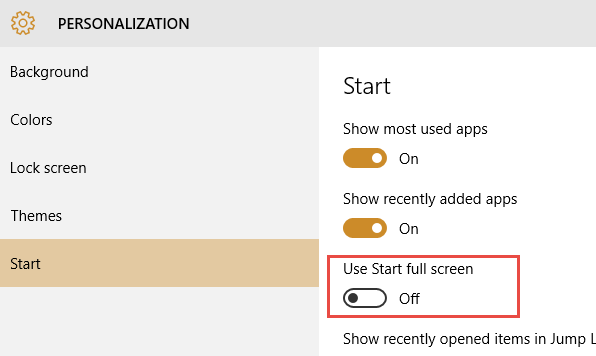
Enable/Disable Full screen Start